|
|
AirMyPC - Airplay For Windows & Cast Client for ChromeCast |
AirMyPC - AirPlay Mirror Windows computer screen and sound to your Apple TV Or ChromeCast
Frequently Asked Customer Questions:
| Answers: |
How to Mirror PC to Apple TV?
How to Mirror PC to Apple TV1. Download and Install AirMyPC from the Download page. 2. Click on AirMyPC tray icon (near computer clock) and choose the Apple TV or ChromeCast device you would like to mirror to. 3. Choose one of the Mirroring options such as Mirror Screen, Mirror Screen & Audio, Mirror Audio ... 4. Your PC will be mirrored to Apple TV. Full Installation Guide about how to Mirror PC to Apple TV can be found here. |
|
When I click AirMyPC tray icon I see "No devices were found". How do I Make AirMyPC to find my Apple TV/ChromeCast?
After you verified that your Apple TV/ChromeCast And your computer are both connected (Have an IP address) AND are both connected to the SAME Wi-Fi network, under the
same subnet, then there are few procedures you should try. Lets start with the easiest procedures: First advice is just to give AirMyPC some more time to find your devices. If you see that AirMyPC does not find your device after 1 minute then: 1) For AnyCast/EzCast/MiraScreen (which should be on AIRPLAY mode and NOT on Miracast mode): Make sure your AnyCast/EzCast/MiraScreen is connected to your Wifi network (you set your Wifi network password into AnyCast/EzCast/MiraScreen settings screen). If that does not help then try to connect to the AnyCast/EzCast/MiraScreen Wifi network. To do that choose the AnyCast/EzCast/MiraScreen Wifi network in the Wifi list by pressing the Wifi tray icon near your computer clock and choosing that Wifi network. Wait few seconds and press AirMyPC tray icon to search for your AnyCast/EzCast/MiraScreen devices. 2) For Apple TV: Press the Middle button on your Apple TV remote to wake your Apple TV. Wait a few seconds and then click again on AirMyPC tray icon to find your Apple TV (If that does not make AirMyPC to find your Apple TV then try to Restart AirMyPC: Click AirMyPC tray Icon>Choose Exit, then Run AirMyPC again from the desktop Icon). If that did not help then: 3) You can try to uninstall "Bonjour" from Windows Add/Remove, then Exit AirMyPC (tray menu>Exit) and Re run AirMyPC - In most cases this will solve the issue. If that did not help then: 4) Restart your computer (This for restarting your Wifi Driver). After restarting the computer, AirMyPC should find your AppleTV. If that did not help then: 5) For Apple TV: Check that AirPlay is enabled (Settings, AirPlay) and then try to restart your Apple TV (Apple TV 4/4K: Settings, System, Restart; Apple TV 3 and earlier: Settings, General, Restart). After your Apple TV loaded, wait 1 minute and then retry to Mirror using AirMyPC. If that did not help then: 6) Most likely your Firewall blocks AirMyPC or blocks the “Bonjour” service (if you have the “Bonjour” service installed). You should allow both AirMyPC and the "Bonjour" service (again if you have the “Bonjour” service installed) through your Firewall (whether it is Anti Virus Firewall or Windows Firewall). If you have Windows Firewall running there then Click to learn how to set AirMyPC through your WINDOWS Firewall. Make sure to Allow AirMyPC (and 'Bonjour' if you have 'Bonjour' installed) in both "Home/Work private" and on "Public". If that did not help then: 7) If that did not work then: Restart your network/Router. After your network/Router loaded, wait 1 minute and then retry to Mirror using AirMyPC. If that did not help then: Some routers are set to block multicast traffics. Blocking multicast traffics will prevent AirMyPC from finding your Apple TV/ChromeCast/AnyCast/EzCast/MiraScreen. If all procedures above did not help or in case your network does not support mDNS (multicast traffics) then you can use the DirectConnect option. DirectConnect option lets you to insert your appleTV IP/IP's to the DirectConnect list. Then AirMyPC can use these IP's to find your AppleTV/ChromeCast without mDNS/Bonjour. To Add IP/IP's to the DirectConnect list, click AirMyPC icon. In AirMyPC tray menu, choose the Edit DirectConnect to AppleTV/ChromeCast List option. In the Input box you get, set your Apple TV/ChromeCast IP address. If you have more than one Apple TV/ChromeCast devices then set each AppleTV/ChromeCast IP address in a new line. If you set ChromeCast IP then make sure to add the '@' char to the beginning of the IP address (Example: @192.168.2.6) so AirMyPC will know it is for ChromeCast device and not for AppleTV (Set '*' For ChromeCast-Audio/Google Nest Mini Device; Example: *192.168.2.6). If you add AnyCast/EzCast/MiraScreen Device then add '&' as a prefix to the IP. When done, save. You can also specify the desired iDevice Name in addition to its IP. For example if your iDevice IP is 192.168.2.7 and the name you would like to give it, to identify it, is 'Toms Room' then it should be set as [Toms Room 192.168.2.7] or as [Toms Room @192.168.2.7] in case it is ChromeCast Device. or as [Toms Room &192.168.2.7] in case it is AnyCast/EzCast/MiraScreen Device. You can even group the iDevices into Groups like this: {GroupA [Office 192.168.2.11] [Lab 192.168.2.12]} {GroupB [Lab0 192.168.2.13] [Lab2 192.168.2.7] [Lab6 192.168.2.151]} {Classes [Class1 192.168.2.14] [Class2 192.168.2.15] [Class3 192.168.2.19] [Class4 192.168.2.22]} <DomainA {GroupC [OfficeC1 192.168.1.110] [OfficeC2 192.168.1.120]} {GroupE [OfficeE1 192.168.1.117] [OfficeE2 192.168.1.118]} [LabC 192.168.1.119]> <DomainB {GroupD [LabD1 192.168.2.130] [LabD2 192.168.2.70] [LabD6 192.168.2.171]}> From now on, whenever you click AirMyPC tray icon, AirMyPC will show you these IP addresses you have set as AppleTV/ChromeCast devices which you can Mirror to. If your Network does not support Bonjour/mDNS (multicast traffics) then you can turn off completely the mDNS lookup in AirMyPC Settings Screen. Turning off Bonjour/mDNS (multicast traffics) discovery will cause AirMyPC to find only devices which you have set in the DirectConnect list. To get your AppleTV IP, on your Apple TV, go to Settings, General, About. You can even make your AppleTV IP to be a static IP so it will not be changed on each network restart. To make it Static IP, on your Apple TV go to Settings, General, Network, Ethernet, Configure IP, Set it to Manual, leave the IP you see there as it is and just choose 'Done'. Leave the Subnet Mask as it is and just choose 'Done', leave the Router IP as it is and just choose 'Done', leave the DNS as it is and just choose 'Done'. To get your ChromeCast IP and MAC address download the Chromecast app form the Play Store or the Windows version from: ChromeCast Setup Page To make your ChromeCast IP a Static IP, Configure your router to assign a static IP to your ChromeCast MAC address. |
|
AirMyPC takes too much CPU. Is there anything I can do?
There are four main factors that increase CPU load: 1) Image scaling AirMyPC does to scale your computer screen resolution to the resolution of your AppleTV/ChromeCast. 2) The distance that the mirrored data has to pass from your computer, to your router and from there to your Apple TV. 3) Network load (which is the main cause for lags/latency issue). 4) You are Mirroring a laptop which is on Battery and not on AC power (does not plugged in). Now for tips how to decrease CPU load: 1) Scaling - if you set your computer screen resolution to be the same as your Apple TV/ChromeCast resolution then no scaling will accrued and CPU load will dramatically decreased (and streaming quality will dramatically increased): AppleTV 2 resolution is 720x1280 (720P) - So if you have Apple TV 2 then in AirMyPC settings screen just press the Change to 720P button. Apple TV 3/Apple TV 4/4K resolution is 1920x1080 (1080P) - So if you have Apple TV 3/4 then in AirMyPC settings screen just press the Change to 1080P button. ChromeCast resolution can be set to 720P or 1080P - So For better performance just press the Change to 720P. If you have computer with a strong CPU then you can try the Change to 1080P button. In v3.6 we added a new option "Adjust PC screen resolution for better performance and quality". While this option is enabled, after you start mirroring, AirMyPC will automatically change your PC screen resolution to match to the iDeviece resolution you are mirroring to. This will optimize performance and picture quality so it is really recommended to use this option. AirMyPC will return your original PC screen resolution when done mirroring. 2) Distance - Best will be to wire connect your Apple TV/ChromeCast to your router. If that is not possible then, at least, try to reduce the distance between your computer and your Router AND between your Apple TV/ChromeCast and your router. As much as your computer and your Apple TV/ChromeCastare closer to your router, the better performance you will get since this reduces the distance the transmitted data needs to pass from your computer to the router and from there to your Apple TV/ChromeCast. This will reduce the latency and the packets lost/packets retransmission. 3) Network load - This is not really a CPU issue but rather than a lags/latency issue. When you download a file/view movie online this takes portion from your network bandwidth. If you mirror a movie at the same time when your PC download files/movie stream, then you may see lags/latency in the stream AirMyPC sends to your TV. In this case best way will be to stop all downloads/wait until the entire movie you watch will be downloaded before you start mirroring. 4) Laptop Battery Mode - Some laptops, while on Battery mode (not connected to the AC power) limit CPU power and speed to the minimum to save battery life. Connecting your laptop to an AC power while AirMyPC is mirroring, will make AirMyPC to perform better. You can also cancel Laptop Battery Mode (Windows System Settings>Power Sleep And Battery Settings>Battery Mode>Battery Saver) * From version 2.0.6 there is a cool option to change the number of images that AirMyPC sends per second to your iDevice (Frames per second). Default is set to around 22 images per second. Lowering this number will result is less CPU consumption but may not be suitable for mirroring movies where frames rate is important. Increasing this value will result in more CPU consumption but in case your computer has a strong and fast CPU, increasing this value to around 25 or so should reduce lags. In the end it is a matter of trial and error to find which settings work better for your computer type and for the type of media you mirror (Static desktop/Normal use which does not require high Frame Rate or movie which requires that). |
|
While mirroring audio, I do not hear any sound from the TV, even after increasing the TV volume
When using AirMyPC to mirror audio, the PC speakers are muted by default to ensure that sound is only played through your TV and not on your PC simultaneously. However, some audio devices may not allow sound capture when the speakers are muted. To resolve this issue, follow these steps: Try to change the Selected (default) Audio Device: a) Left-click on the sound icon located in the taskbar. b) Above the volume bar, you will see the name of the currently selected audio device. c) Click on the drop-down list to view all available audio devices. d) Select another audio device by left-clicking on it. e) Try to mirror the audio again to see if the issue is resolved. 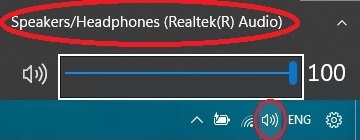 If you only have one audio device or changing the audio device didn't help, Try to install a Virtual Sound Card App Download Virtual Sound Card (just press the download button on e2esoft page). and proceed with the following steps: After installing the Virtual Sound Card, (there's no need to configure or change any settings within the Virtual Sound Card application. Simply exit the application screen. Then, check to ensure that the e2esoft Virtual Sound Card is set as your default audio device by following these steps: a) Left-click on the sound icon located in the taskbar. b) Above the volume bar, you will see the name of the currently selected audio device. c) Ensure that the e2esoft Virtual Sound Card is selected as the default audio device. d) If it's not selected as the default device, choose it from the audio devices drop-down list. 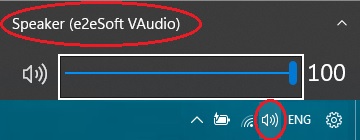 e) Try to mirror the audio again to see if the issue is resolved. If you still have issues just contact us. |
|
While Airplay mirroring a movie, I see lags/latency in transmitted movie on my TV. Is there anything I can do?
See answer to AirMyPC takes too much CPU. Is there anything I can do? question.
Especially pay attention to the Network load section. |
|
Where can I find and read AirMyPC Installation Guide?
AirMyPC Installation Guide about how to Mirror Windows to Apple TV can be found here. |
|
While mirroring, sometimes mirrored stream quality decreased. Why?
v4.0 have a very cool feature which you can find in AirMyPC settings screen as "Enable performance optimizations ...".
When this option is enabled, Airmypc senses your Network speed & load and when detected that the network is loaded or has become slower, AirMyPC automatically starts lowering the stream bitrate and resolution for trying to prevent/reduce lags and latency. When AirMyPC seneses that your network is less loaded, it will start increasing stream bitrate and resolution. |
|
What does the Education Interactive Tools Suite add-on do? Must I purchase it if I just want AirMyPC?
The Education Interactive Tools Suite is an Optional addon product that allows you to Draw on your Desktop or on any other Software Window. You will be able to Draw on your computer screen using one of the selected Interactive Tool like the Pen Tool or one of the Shapes Tools (as Circle, Rectangle, Arrows, Chats, Etc.) by making your TV screen a Whiteboard Interactive Screen. You will be able to choose whether to draw with opaque or with transparent Colors. You will be able to use the Eraser tool, to choose any drawing color you want using the Color Picker tool, to Undo drawing etc. You will be able to type text using the Text Tool. You will also be able to save your work to .BMP or .JPEG files. And of course with the help of AirMyPC, everything you draw or type on your computer screen, will be sent to your AppleTV/ChromeCast and be reflected on your TV screen (As can be seen in the TV image below). To open the Interactive Tools Suite, just start Screen mirroring. Then click AirMyPC icon and choose the "Open Interactive Tools Suite" option. 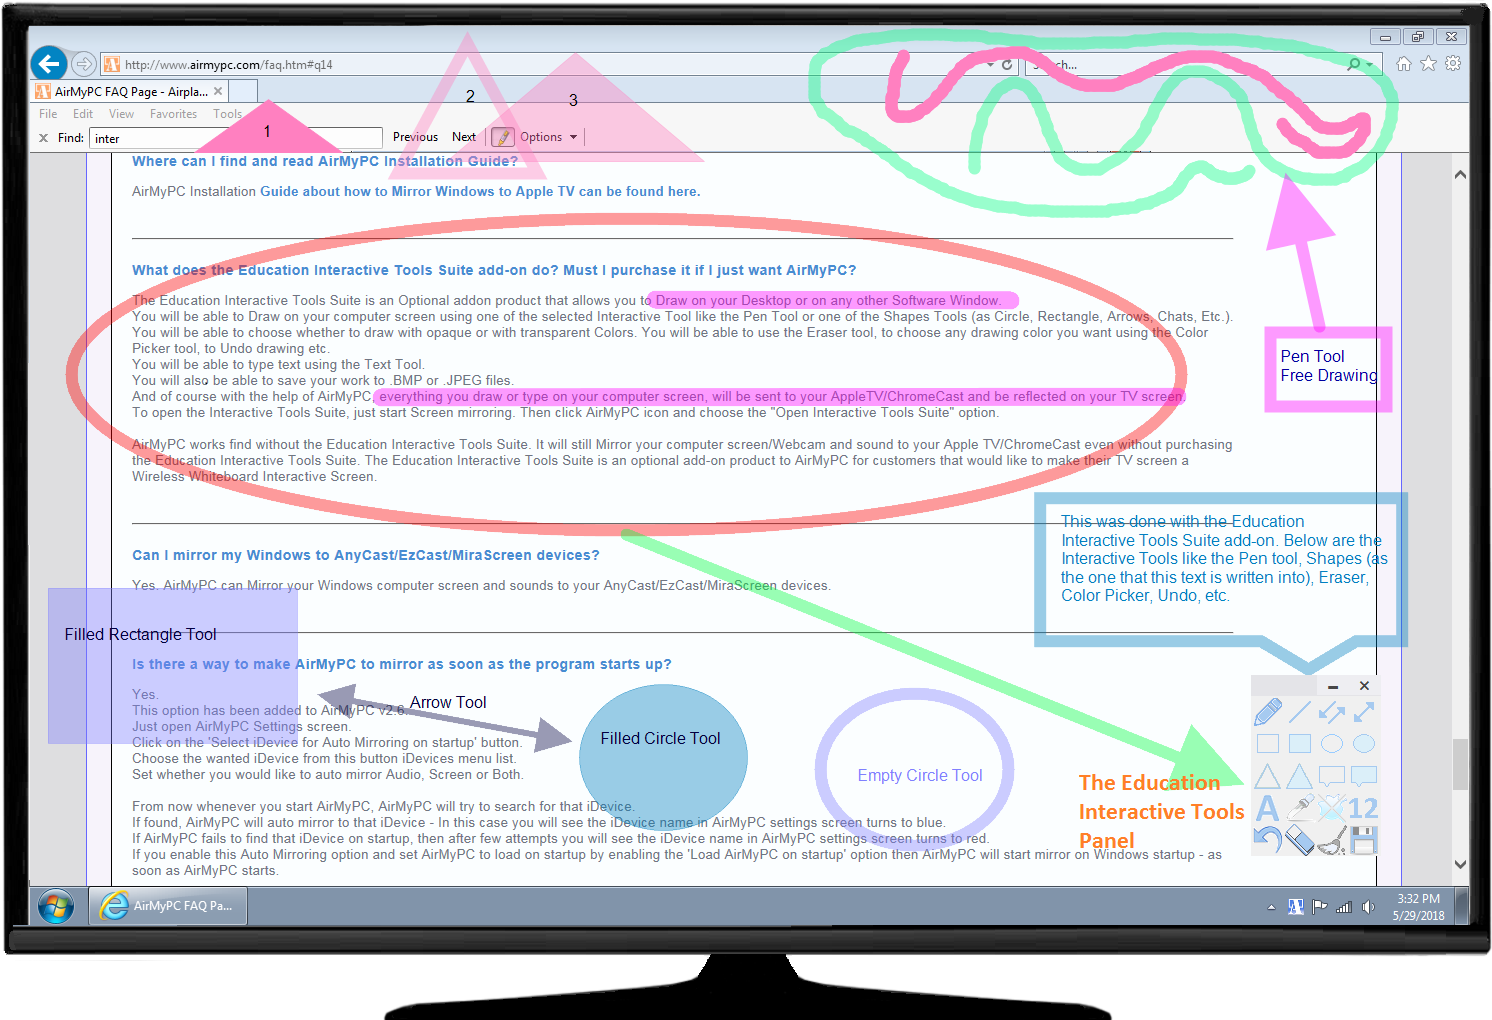 AirMyPC works find without the Education Interactive Tools Suite. It will still Mirror your computer screen/Webcam and sound to your Apple TV/ChromeCast even without purchasing the Education Interactive Tools Suite. The Education Interactive Tools Suite is an optional add-on product to AirMyPC for customers that would like to make their TV screen a Wireless Whiteboard Interactive Screen. |
|
Does AirMyPC work even with the newest AppleTV and with the newest tvOS (Yes it does!)?
Yes it does! You can Mirror Windows with AirMyPC to Apple TV 4/Apple TV 4K/Apple TV 2/Apple TV 3 Or AirPlay 2–Enabled TVs (Like new Sony TV, Samsung TV, LG TV, VIZIO TV) You can also Mirror Windows PC with AirMyPC to ChromeCast, ChromeCast-Audio, Google Nest Mini Or AnyCast/EzCast/MiraScreen (In AirPlay mode) devices |
|
Should my Apple TV/ChromeCast be wired connected to the router or connected wirelessly to my Wi-Fi?
AirMyPC works in both cases. Your Apple TV/ChromeCast can be wired to the router or connected to the router using the same Wi-Fi your computer is connected to. Though, you will get better performance if your Apple TV/ChromeCast is wired to the router. |
|
Can I simultaneity mirror to more than one iDevice?
We are working on adding this option. If you urgently need this feature, you can open more than one instance of AirMyPC and mirror each instance to a different TV. By default AirMyPC will not let you to open more than one instance. To enable more than one instance: 1) Open AirMyPC Settings screen. 2) Then hold the CTRL key and while it is down, click the support button in AirMyPC left menu. This should open AirMyPC settings folder. 3) There you should see a file with the name settings.txt Add this line to the end of the settings file and save: allow_more_than_one_instance:1 4) Then Exit AirMyPC and re run it again. From now you will be able to open more than one instance of AirMyPC. |
|
Can I install and run AirMyPC on my Mac computer?
No. AirMyPC can be installed on Windows only. Mac OS has its own AirPlay mirroring capabilities. No need for 3rd party software to AirPlay Mirror your Mac to your AppleTV. Windows OS on the other hand does not have AirPlay Mirroring built in capabilities and this is where AirMyPC takes place. |
|
My Apple TV is set to require a password to AirPlay. Does AirMyPC support that?
Yes. AirMyPC supports the 'Password' and the 'On Screen Code' security options. When you start mirroring, AirMyPC will ask you for the AirPlay Password/Code. |
|
Multi-casting (mDNS) is turned off on our campus network so AirMyPC does not find any Apple TV/ChromeCast to connect to. Any solution?
We have lots of AppleTVs in our organization and sometimes AirMyPC does not show all of them / sometimes when we switch from Ethernet connection to Wifi it does not find new AppleTVs / and in anyway the List of AppleTVs is to long. Any solution?
Yes. Just set AirMyPC to disable mDNS lookup in AirMyPC settings screen and add your AppleTV/ChromeCast IP-Address/IP-Addresses to the DirectConnect list. In this case, it is recommended to make the AppleTV/ChromeCast IP to be a static IP so it won't be changed on network restart. If you have many appleTVs and the list of AppleTVs AirMyPC shows is to long or you just want more control on it, you can even group the iDevices into Groups. More info about DirectConnect feature and the used syntax can be found here: How to AirPlay/Cast Mirror without using mDNS/Bonjour service. |
|
We want to install AirMyPC on all our company's computers. Do you have a bulk/mass/Single-Click-Installer option which allows us to Install, set and register AirMyPC using a single click install per each computer?
Yes. This lets you to install AirMyPC using pre-configured settings file. Once you run the Single-Click install file, Installer silently installs AirMyPC (without any wizard installation screens), runs and registers it using the settings (DirectConnect IP list, IP Filter List, Mirroring Quality, etc.) and the registration key you have set into the pre-configured settings file. In other words, Installing, Setting and Registering AirMyPC is done by a Single-Click per each computer you would like to install AirMyPC. You will also be able to put AirMyPC settings file in a remote shared folder in your Network so any settings change you make to this settings file will be reflected on all other computers on your network that run AirMyPC. To do that, please download mass files from here: Click to download Bulk/mass/Single-Click-Installer Zip file That Zip file contains 2 files: =========================settings.txt============================== The first one is settings.txt. Using this file you can set all the wanted settings including the registration key. When you install AirMyPC, AirMyPC installer checks if file with the name settings.txt exists in the same folder where the installer is located. If that settings.txt file exists, AirMyPC will be installed using the settings you have set in the settings file. If you open settings.txt file, you will see that most of the settings values are 0 or 1 For example setting: capture_mouse_cursor:1 will enable the show mouse cursor option. capture_mouse_cursor:0 will disable that option. Setting: run_after_install:1 will tell AirMyPC to run after the install. Setting: run_after_install:0 will tell AirMyPC to try to register itself using the key you provide (if you provided one) and then to exit. If your AppleTV is password protected, then you can set the password like this password:abcd (assuming abcd is the password). If you do not use mDns discovery and want to manually set ATV ip's then in the settings file set: enable_mdns_discovery:0 (currently it is 1 by default) As for the list of Ip's you can set the list of the DirectConnect Ip's like this: direct_connect_ip_list:192.168.2.4 192.168.2.5 192.168.2.8 [desired ATV name 192.168.2.10] [Office 192.168.2.11] {Group1 [desired ATV name1 192.168.2.12] [Office2 192.168.2.13] [Office3 192.168.2.14]} Since your registration key is XYZ then it should be set in the settings file as: key:XYZ (Replace XYZ with your registration key). As explained, If you put AirMyPC.exe installer AND the setting.txt file in the same folder, then when you run AirMyPC.exe installer, installer will install AirMyPC and run it. When AirMyPC starts, it will read all settings from that settings file. If you provided a registration key then it will take that registration key and register itself. (you will get confirmation email to your mailbox for each registration). Keep in mind that there will be two accesses to the Internet (per install). One access will be from the installer, when you install AirMyPC as it always does when you install AirMyPC. Second access will be from AirMyPC itself for the one time activation using the key you have set. So please make sure your Firewall allows that. =========================run.bat============================== The second file in the zip file is run.bat This bat file will run the installer in silent mode with no visible screen so you will not need to press Next, Next ... Just make sure to put it in the same folder where you put AirMyPC.exe installer and the settings.txt file. =========================Summery============================== 1) So to sum, set the wanted settings into the settings file. 2) put settings.txt, run.bat, AirMyPC.exe installer in the same folder. 3) run run.bat file and it will do everything for you. This needs to be done on each computer you would like to install and register AirMyPC. ================Remote Settings file option=================== If you like, you can even set AirMyPC to get the settings file from a remote location on your LAN (every time when it starts) - this allows you (when you need to change settings like DirectConnect ips ...) to apply settings change on all computers. For this to work, the apply_settings_for_all_users in the external setting file must be set to 1: apply_settings_for_all_users:1 (apply_settings_for_all_users makes sure that all windows account on the computer will get the setting from the setting file and not just the account you install AirMyPC from. The value of network_shared_settings_file_location should set to be the remote setting file location (only the path) like this for example: network_shared_settings_file_location:\\remote computer name\shared folder name\ I.E without the setting.txt network_shared_settings_file_version is the version of the setting file. Start it with 1. Also make sure to copy the external setting file to that shared folder (you can remove the key from the remote file since it is not needed) After you make the one-click-install, whenever AMPC starts, it will read the remote setting file. If version on the remote setting file (the value you set in network_shared_settings_file_version) is bigger than local user setting file version then it will take all setting from the remote setting file - that is why whenever you make a change into the remote setting file, you need to increase the network_shared_settings_file_version by 1. If versions of local setting file and remote setting file are the same then AMPC ignores that remote file. This way it will overwrite the local setting file (and the changes local user makes to the settings) only if you really make a change the remote setting file version. Remember, AirMyPC reads the remote settings file only when it starts. It may take more time for AirMyPC to start since on startup it accesses remote location now. ================Remote Settings file summery=================== So to sum add these to the setting file you use with your installer: apply_settings_for_all_users:1 network_shared_settings_file_location: network_shared_settings_file_version:1 Set network_shared_settings_file_location with the location as: \\remote computer name\shared folder name\ Do not forget to put the same external setting file you use with the installer into the shared folder (you can remove the key from it since it is not needed). * Note that you need to purchase a license key for each computer you install AirMyPC. |
|
My Windows Firewall blocks AirMyPC from connecting my Network. How can I set AirMyPC to connect through WINDOWS Firewall?
To allow AirMyPC to communicate through Windows Firewall: 1) Open Windows Firewall by clicking the Start button, and then clicking Control Panel. In the search box, type firewall, and then click Windows Firewall. 2) In the left pane, click Allow a program or feature through Windows Firewall. 3) Click Change settings. 4) Select the check box left to "AirMyPC - Mirror your ...", AND select the two check boxes right to "AirMyPC - Mirror your ..." (As you can see in the Image below) and then click OK to save. 5) Allow the Bonjour service as well (only in case you see Bonjour service in the list). 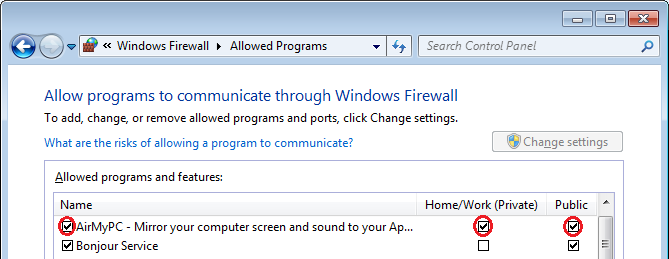 |
|
I have Windows Vista/7/8 and some of the applications as Kodi are mirrored as black screen. How can I solve this?
On Windows Vista/Windows 7/8, AirMyPC by default disable Aero Theme for better performances. This can cause AirMyPC to mirror Black screen for some applications that use layered windows. To solve this: 1) First make sure you have one of the Windows Aero theme set (Right click desktop>Personalize>Choose one of the Aero theme under the 'Aero theme' (like 'Windows 7'). 2) Set AirMyPC to not disable Aero. to do that: a) Open AirMyPC Settings screen. b) Hold the CTRL key and while it is down, click the support button in AirMyPC left menu. This should open AirMyPC settings folder. c) There open the settings.txt file and change the value of disable_aero to '0' like: disable_aero:0 d) Save the settings file. e) Right click AirMyPC tray menu and choose Exit to Exit AirMyPC. f) Re run AirMyPC and mirror. |
|
NETFLIX is mirrored as a black screen using my Internet Browser. How can I solve this?
Netflix (and similar services) employ technologies to protect their content from unauthorized copying and distribution. This can prevent our software from correctly capturing the video stream. Disabling Browser Hardware Acceleration in your browser settings might allow our software to capture the Netflix stream. Chrome Browser: Open Chrome and Click three dots menu in the top right corner of the browser window. Select the 3 lines hamburger menu mext to the Settings. Click on System in the left-hand panel. Turn off the toggle switch next to Use hardware acceleration. lick the Relaunch button to restart Chrome with hardware acceleration disabled. Firefox Browser: Open Firefox and Click on the hamburger menu (three horizontal lines) in the top right corner of the browser window. Select Settings from the menu. In the Settings window, click on General in the left-hand panel. Scroll down the General settings and find the Performance section. Uncheck the box next to Use recommended performance settings. This will reveal additional settings. Uncheck the box next to Use hardware acceleration when available. Restart Firefox to apply settings Microsoft Edge: Open Microsoft Edge and click on the three dots menu (ellipsis) in the top right corner of the browser window. Select Settings from the menu. In the Settings window, click on General in the left-hand panel. Click on System in the left-hand panel. Under System, you'll see the toggle switch for Use hardware acceleration when available. Turn it off. Click the Restart button to restart Edge with hardware acceleration disabled. Using this workaround to capture content from streaming services might not be permitted under copyright laws and the Terms of Service of those services. Regulations and user rights vary significantly by country. We strongly recommend that you consult the relevant laws and terms of service to ensure your use of captured content complies with all applicable regulations in your jurisdiction. We cannot be held responsible for any legal issues arising from your use of this workaround. Please be mindful of copyright laws and the Terms of Service of streaming platforms. It's your responsibility to ensure you're using any screen capturing software in a legal and ethical manner. |
|
NETFLIX Windows app is mirrored as a black screen. How can I solve this?
Just open Netflix from your Internet Browser (IE/Firefox/Chrome ...) and view it from there and not using the NetFlix Windows App. If you get black screen mirrored using Internet Browser as well then please look here |
|
I have Webroot SecureAnywhere Anti Virus installed and Everything is mirrored as black screen. How can I solve this?
Webroot blocks any application including AirMyPC from capturing the Desktop. To solve this, just set WebRoot to allow AirMyPC to capture your Windows desktop. To do that: 1) Double click Webroot tray icon. 2) In Webroot right side click on the Settings icon  next to the 'Identity protection' option .
3) In the new screen you get click the 'Application Protection' Tab. 4) There set the "Allow" or "Protect" option to the AirMyPC.exe process. |
|
My computer has 2 screens connected. Can I choose which screen to Airplay Mirror?
Yes, if AirMyPC detects you have more than one screen attached to the computer then it will let you to choose the screen you would like to mirror from. |
|
My computer has 2 screens connected. Can I work on one screen and AirPlay Mirror the other?
Yes. If you have Windows7 and above and above then From AirMyPC v1.4.7.1 and above you can do that by selecting "Extend Your Desktop" option in AirMyPC tray menu. Extend your Desktop. Then drag the application you would like to Mirror to the second screen and set AirMyPC to mirror that second display. While AirMyPC Airplay Mirror your secondary screen, you can keep doing your things on your main screen. For older Windows versions, just set the Windows "Multiple Displays" option to "Extend these displays". (Do that by: Right click on the desktop, click 'Screen Resolution' and set the Multiple Displays option to "Extend these displays"). |
|
My computer has only one screen connected. Can I work on one screen and somehow tell AirMyPC to AirPlay Mirror another virtual screen (I.E to extend my Desktop)?
Yes you can! Here is how you can use Apple TV as a second monitor PC: To create a "Virtual" screen which acts as an Extended virtual display for your desktop: If you have Windows7 and above then you can do that by selecting "Extend Your Desktop" option in AirMyPC tray menu. After selecting the "Extend Your Desktop" option, AirMyPC will create a 'virtual' Display and extend Desktop to that Display. Then drag the application you would like to Mirror to that secondary Virtual display screen. While AirMyPC Airplay Mirror that secondary virtual screen, you can keep doing your things on your main screen. Another option you may want to use, instead of the above, is to set AirMyPC to Mirror only the specific Window/Application you would like to mirror (using the Mirror Specific Window option). Then Drag and Resize that Window to fit to the right side of your screen and you work on the left side of the screen. |
|
My computer has only one screen connected. I selected the "Extend your desktop" option for creating a new virtual display but got error message: "AirMyPC failed to create a Virtual Display".
The full error you got is:
"AirMyPC failed to create a Virtual Display. This may happen when your computer does not have a free (unused) analog output such as a VGA or DVI-I port." For AirMyPC to create a new virtual display (assuming again you have only one physical display attached to the computer and would like to have another Virtual one which you can also mirror to your iDevice), you need to have a free (unused) analog output such as a VGA or a DVI-I output port. DVI-D or HDMI are not analog so they do not natively support creating this extra Virtual display and that is why you get this error. After that being said, there are some graphic cards which includes analog output but still do not support creating virtual display. In this case, or in case you do not have analog port, one way to bypass this is to purchase USB to VGA converter. This will make your computer to think it has a free analog VGA output. Just search eBay/Aliexpress for 'Ghost Virtual Display Adapter' (should cost around $2-$3). |
|
AirMyPC Mirrors my screen very well to my Apple TV but it does not mirror Audio. Why?
There can be four main reasons for this problem: 1) Your audio drivers are not installed. Instead you have Windows default audio drivers installed which in some cases do not support Audio playback. Installing your Audio Device drivers should solve this problem. 2) Your Firewall (Anti Virus Firewall or Windows Firewall) blocks some of the ports AirMyPC uses to Mirror Audio. Since these ports are chosen dynamically, you should allow AirMyPC to use all ports through your Firewall. 3) Your sound card output is set to more than 2 Channels Click here to read how to change sound card output settings 4) If all that did not help then try to Mirror audio and then unmute PC speakers (after AirMyPC mutes them) - if that makes the Audio to be heard on the TV but you do not want to hear Audio on both TV & computer then contact us (this can happen with some soundsCards but we may have a solution for that.) |
|
AirMyPC Mirrors Audio but not in a correct pitch. It sounds as if people are talking under water or very slowly. Any fix?
AppleTV streams at 16-bit, 44100Hz, 2 Channels. ChromeCast streams at 16-bit, 48000Hz, 2 Channels. If your sound card works with other sample rate or Channels then AirMyPC should identify that and convert the sample rate to 16-bit, 44100Hz, 2 Channels (Or 16-bit, 48000Hz, 2 Channels for ChromeCast) On rare cases (usually when using Boot Camp to run Windows on Mac), AirMyPC does not recognize that and as a result it does not make any sample rate conversion which causes this incorrect sound pitch you hear. To fix this issue, just set your Sound Card sample rate to 16-bit, 44100Hz 2 Channels (Or 16-bit, 48000Hz, 2 Channels for ChromeCast). To do that: Open Windows Control panel-> type "Manage Audio Devices" and select it. In Playback tab, double click the default Speakers (if you are running Windows on your Mac using Boot Camp then select the digital audio option instead of speakers). Go to the Advanced tab-> There choose 16 bit 44100 HZ 2 Channels (OR 16-bit, 48000Hz, 2 Channels for ChromeCast)->Click OK button to save. |
|
Is there any way to make the quality of the mirrored desktop even better?
Yes. Best way to improve output quality is to reduce/prevent image scaling AirMyPC does to scale your computer screen size to the size/resolution of your AppleTV/ChromeCast. Click here for instructions. |
|
Can I Airplay Mirror Audio only (without mirroring my Desktop)
Yes. AirMyPC allows you to Mirror Screen only, Audio only or to mirror them both at the same time. |
|
AirMyPC disconnects from my Apple TV/ChromeCast every X minutes, what should I do?
Please try to restart your Apple TV (Apple TV 4/4K: Settings, System, Restart; Apple TV 3 and earlier: Settings, General, Restart).
After your Apple TV loaded, wait 1 minute and then retry to Mirror using AirMyPC. If that did not help then, if applicable, turn WMM off on the QoS settings on your router/wireless LAN controller. If that did not help then try turning off passcode security and Conference Room Display, both located under Settings > AirPlay. |
|
Can I mirror my Windows to AirPlay 2–Enabled TVs?
Yes. AirMyPC can Mirror your Windows computer screen and sounds to TVs that have built in support for AirPlay 2–Enabled TVs (Like new Sony TV, Samsung TV, LG TV, VIZIO TV).
|
|
Can I mirror my Windows to AnyCast/EzCast/MiraScreen/Roku TV devices?
Yes. AirMyPC can Mirror your Windows computer screen and sounds to your AnyCast/EzCast/MiraScreen/Roku TV devices.
|
|
Is there a way to make AirMyPC to mirror as soon as the program starts up?
Yes. This option has been added to AirMyPC v2.6. Just open AirMyPC Settings screen. Click on the 'Select iDevice for Auto Mirroring on startup' button. Choose the wanted iDevice from this button iDevices menu list. Set whether you would like to auto mirror Audio, Screen or Both. From now whenever you start AirMyPC, AirMyPC will try to search for that iDevice. If found, AirMyPC will auto mirror to that iDevice - In this case you will see the iDevice name in AirMyPC settings screen turns to blue. If AirMyPC fails to find that iDevice on startup, then after few attempts you will see the iDevice name in AirMyPC settings screen turns to red. If you enable this Auto Mirroring option and set AirMyPC to load on startup by enabling the 'Load AirMyPC on startup' option then AirMyPC will start mirror on Windows startup - as soon as AirMyPC starts. |
|
How to mirror Windows PC to Android Phone or Amazon Fire TV?
Yes that is possible. Here is Step By Step instructions how to Mirror Windows PC to Android Device: You can use AirMyPC to Mirror your Windows computer screen to your Android phone/Amazon Fire TV but for that you will need to download 3rd app to your Android device/Amazon Fire TV that will make your phone/Amazon Fire TV an AirPlay Receiver. You can use AirPlayMirror App for Android phone/Amazon Fire TV which was tested and works perfectly with AirMyPC. In this case, AirMyPC that runs on your Windows computer will AirPlay mirror your Windows PC to AirPlayMirror app which runs on your Android Phone/Amazon Fire TV. |
|
My PC screen is off and while mirroring windows 10 when the UAC (User Account Dialog) is shown, TV screen becomes grey and I do not see the UAC dialog. I need to see it so I will be able click the 'Yes' button. What can I do?
Windows 10 does not allow AirMyPC (or any other program) to capture the screen while the UAC dialog is shown so AirMyPC makes TV screen grey until you close that UAC dialog. To solve the issue you have 2 options: Option 1: Click Start. Start typing “regedit” (without quotes). Navigate to the key – HKEY_LOCAL_MACHINE\SOFTWARE\Microsoft\Windows\ CurrentVersion\Policies\System\PromptOnSecureDesktop Right-click on “PromptOnSecureDesktop” and click Modify. Enter 0 in the Value data box and click OK. Exit Registry Editor. This will return the Win7 UAC dialog style which AirMyPC can capture. Option 2: While UAC dialog is shown, just press the Tab key twice and then the Enter key. This will simulate pressing the 'Yes' button. |
Copyright © 2014 - 2024 AirMyPC.com. AirPlay/Apple TV/iPhone/iPad/Mac are trademarks of Apple Inc., registered in the U.S. and other countries. Google Cast/Android/Chromecast are trademarks of Google Inc.